Pre-Production: How the Heck Do Clothes Get from Idea to Production?
So, you have an idea for the most amazing line of clothes EVER, and you just know it is a winner. You make the decision to start an apparel company. You get your new logo, your branding is just right. You know who your customer is, and you know how you want to sell these amazing garments. YOU ARE READY!
But wait . . . you have no experience in how to actually make clothing. You are in a pickle, indeed! Never fear, I am here to help you make heads and tails of the very confusing world of apparel production.
Let us talk options first, and then we will delve into the steps more thoroughly later. I am going to use a bunch of industry-specific words, and over the course of my future posts, I will explain them in more detail.
Development Management Options
There are endless ways to get from point A to point Z, but there are a few common methods people who do not have a deep understanding of apparel production and pre-production can pursue:
- Hire an all-inclusive development company
- Hire contractors to help with technical work, such as pattern-making and grading
- Learn how to do everything yourself
There are pros and cons to each of these methods, so let us quickly address each of these:
All-Inclusive:
Pros
- One-stop-shop for the entire lifecycle of the product
- Accustomed to working with newbies, and will hold your hand through the whole process
- Usually more ethical in terms of pay for workers
- Can help with finding vendors, suppliers, photographers, web developers, etc.
Cons
- EXPENSIVE
- You have to use their preferred vendors; less flexible
- High minimums
- Longer lead times
- Can incur hidden extra costs
- Want a large deposit upfront, often 50% of the projected cost
Independent Contractors:
Pros
- Flexible
- Typically, Faster
- Hire when needed, not on retainer
- Experts in their field
Cons
- You are likely not a priority, unless you have a long-established working relationship
- Do not typically work on credit
- Need to be properly vetted- which is problematic if you do not know what to look for
- You become a project manager: Have to manage multiple contractors, ensure they are all working to the same standards, and are all on time.
- Can incur extra costs if lots of changes need to be made or mistakes are made
- Risk of sub-contractors being used without your knowledge, less control
Do It Yourself:
Pros
- Cheap!
- Complete control of the product
- Bragging rights
Cons
- You do not know what you do not know
- Slow
- Requires extreme self-discipline
- Burnout
- Potential for extremely expensive mistakes
- Factories often will not want to take you on as a risk
Here are the main things to NEVER skimp on:
- Patternmaker
- Grader
- Fit Samples
- Product Photography (this is what sells your goods)
If you have a good patternmaker whom you can trust, they can help you avoid the costliest mistakes and help you take your idea and make it a well-fitting reality. They typically also do your grading and have working relationships with sample makers they prefer working with. NETWORK, BABY!
Development Process Overview
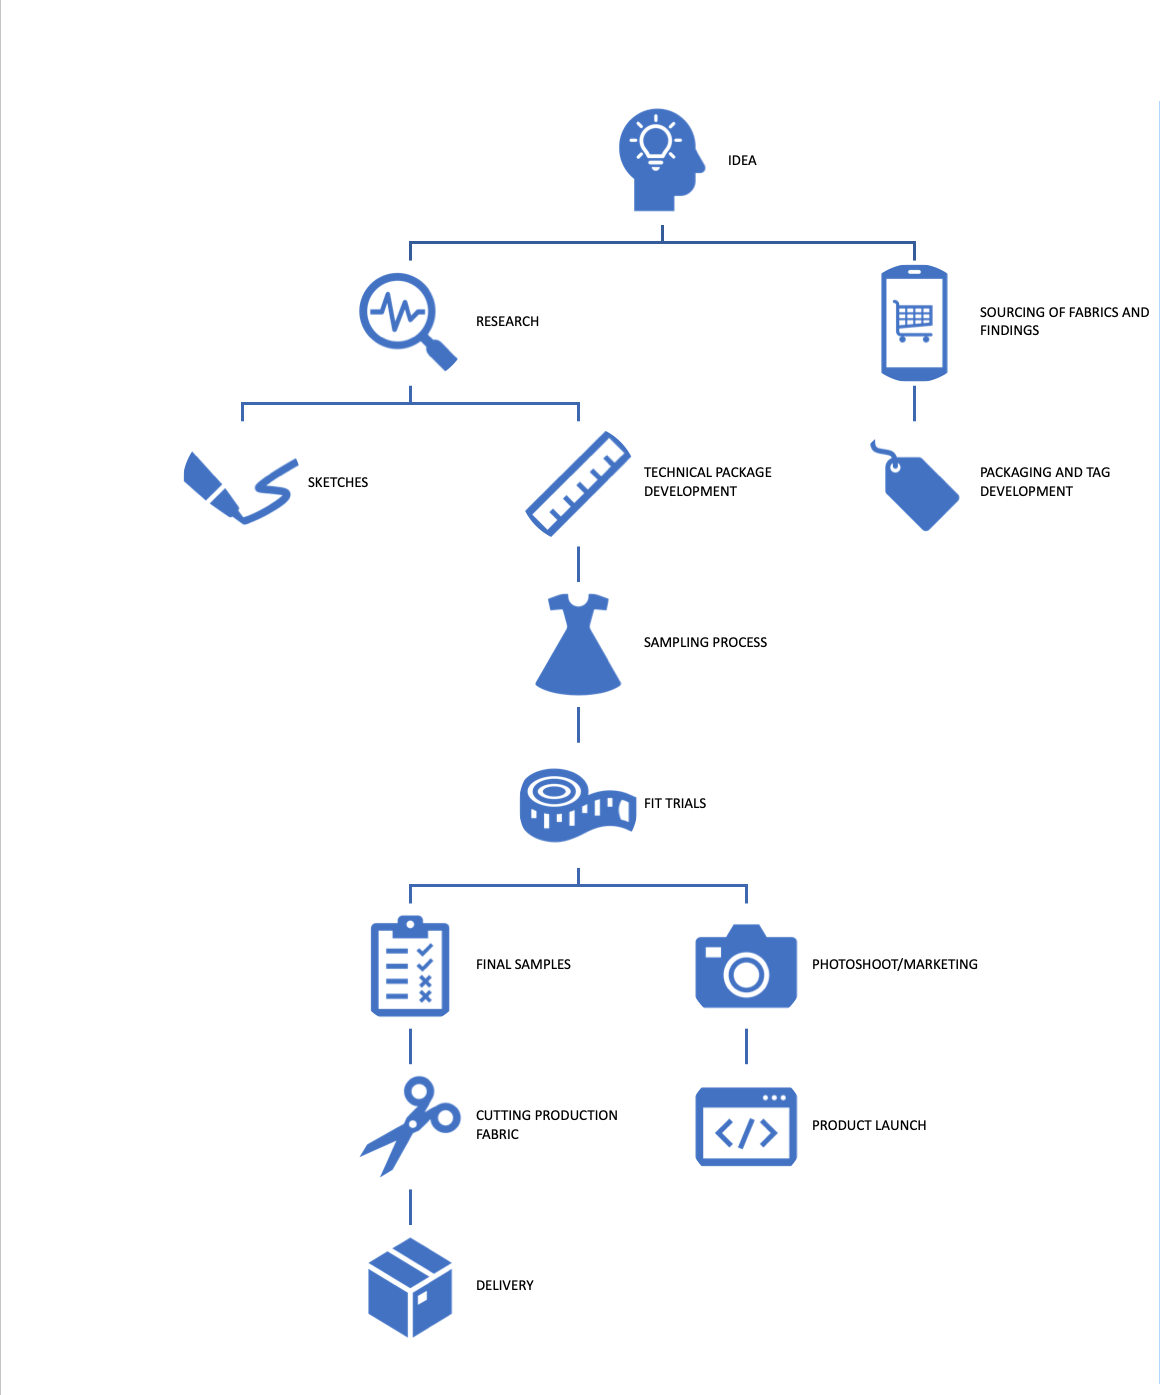
You now have a good grasp of the options available for development management, but how do you actually develop a product? What are the steps to get from idea to finished garments ready for sale? Let us get a broad look at the process together, shall we? This chart above is a general flow of the product development process.
IDEA
This is the MOST EXCITING phase of the process. You are all fired up about this new thing you want to make. Now…time to make good. Let us get started!
RESEARCH
This stage is very often overlooked in all the excitement, but it is essential to your product becoming a reality. What do I mean by research? Research can include the following:
- Comparison of garments for construction/finishing techniques
- Comparison shopping for saturation of the market/target demographics or need for product
- Color/trend research
- Target cost of garment. THIS IS THE MOST IMPORTANT THING TO KNOW.
- You need to understand how much you want to sell the garment for, so you can then determine how much you can spend on all the components.
- Budget: how much can you spend? Ok. Now. Add 25% to that. No, REALLY.
SKETCHES
These are IMPORTANT. These are not just pretty pictures that make your idea look cool. Think of your sketches as a road map, and the person following it cannot read. Your sketches need to show stitch types, design lines, any closures — such as zippers and buttons — and any strange construction details that can be confusing.
Many factories employ people who are skilled at sewing but cannot speak English and rely on these images to clearly show what they need to do.
If you are not a skilled illustrator, either hire one or utilize photographs to show these details. Remember that research you did? TAKE PHOTOS of all the things you want to copy in your garment, then drop that photo into your sketch with a line pointing to the exact location you want it used on.
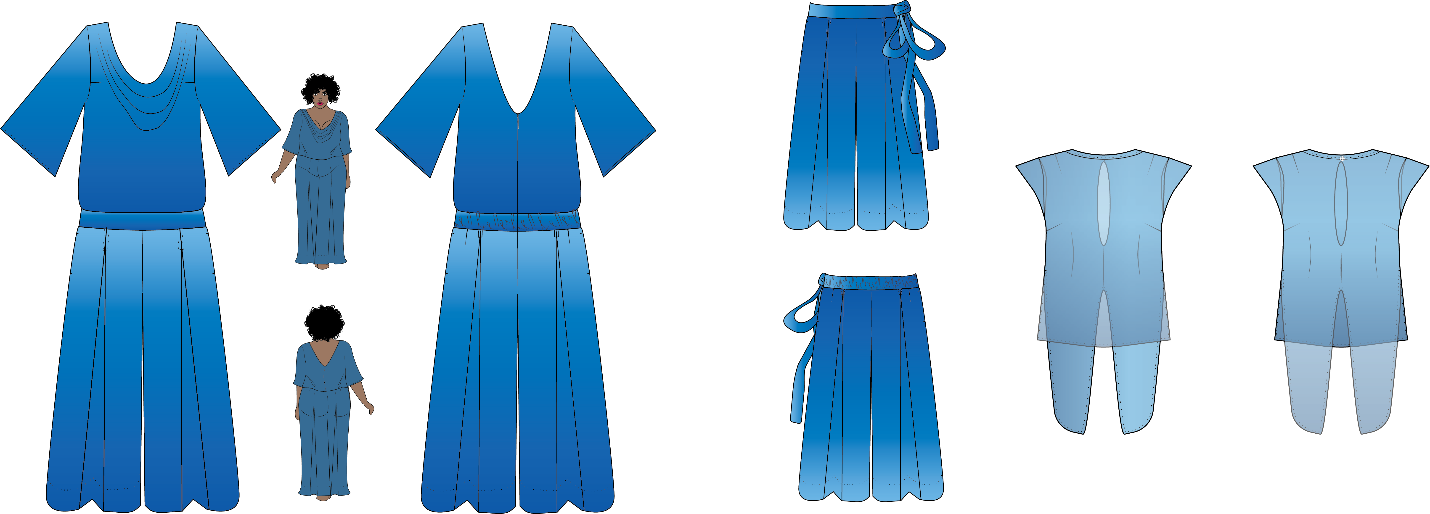
This will save you so much heartache later, I promise! See an example of a tech sketch I did below:
Typically, you would do these without color in them, but where is the fun in that for you? You can see I did the jumpsuit on a croquis, as well as flat. The flats are essential, as they show the patternmaker how to design the pieces, and the croquis shows the drape and proportions of the garments when worn. You always want a front and back image, and if there are small details that are hard to see, do a separate page of detailed drawings.
TECHNICAL PACKAGE
This document is a living document: it will change as the development process goes along. This document will also serve as a contract between you and your factory. What does that mean? When you go to have your garments made, this document will outline every single detail of the garment: stitch types, fabrications, findings, number of stitches per inch, color management of fabrics, the packaging details, and so much more.
This is how you hold your factory accountable.
If your tech pack is incomplete, the factory can make decisions that negatively affect your end product and therefore your bottom line. DO NOT try to go to production without a perfect tech pack. This will protect you from owing money for mistakes that were not your own.
Do not give away your profits because you did not take the time to fully flesh out your tech pack! We will go over tech packs in a future post in a more detailed manner.
SAMPLING PROCESS
This is my personal favorite part of the process because this is where the dream becomes a reality. I love seeing my idea mocked up and on a body. I love going over every detail with a fine-tooth comb and finding the mistakes. Even better, I also love seeing my fit model light up with joy over some tiny detail I thought no one but me would notice. What a thrill!
This is also an incredibly challenging process, as well as an emotional one. Work with real, live bodies in your fit sessions because they can give you important information that a mannequin cannot. It is worth every penny to hire a professional fit model. They are trained to give feedback, to notice things like a tight neckline, or a badly rotated sleeve, particularly if you are not a skilled fitter. The fit process often looks like this:
First Prototype Sample (P1)>Corrections to Sample maker> P2> Corrections> Repeat until satisfied> JSS* (Jump Size Samples) or Full Size Set Samples>Corrections>Final Samples>Photo Samples>Production
*JSS samples are a sample of every other size in your run, to test the pattern grade. Supposing you have a size spread of XXS-3XL, your jump sizes would be: XXS, M, XL, 3XL, and Medium would be your base size. If this sounds like a foreign language to you, that is ok. We will talk about it in the future!
FABRIC & FINDINGS SOURCING/TAG & PACKAGING DEVELOPMENT
While you are working on your samples and tech pack, you will simultaneously be sourcing all the components for the garments. Holy smokes! Feeling overwhelmed yet? Highly organized people do really well in product development, as you might suspect. Spreadsheets are your friends! If you happen to be a StartUp FASHION member, there are so many resources that will help you track all the information you need, right on the website. How wonderful, yes?!
What the heck is a component? Remember your tech pack? There is a page in there called a BOM, or Bill of Materials. This is basically a spreadsheet of every single thing you need for a garment, i.e. components. This includes:
- Thread
- Labels
- Tags
- Fabrics
- Interfacings
- Linings
- Closures
- Trims
- Findings (all the gizmos and gadgets that are not available in yardage)
- Packaging
- Heat press
- Screen printing
- And so much more
A BOM is also a shopping list. It helps you find all the bits and bobs and can track where you find everything in case you need to reorder or follow up on an order later.
How does one find suppliers? Google is a fickle friend but can be useful. There are resources on the StartUp FASHION website, or you can attend expos such as the LA Textile Show, DG Expo, or Texworld. You can also find suppliers by going to the LA or NYC fashion districts and visiting showrooms. Showrooms can require appointments, so call ahead, and make sure you have your business license and resellers permit on hand.
PHOTOSHOOT and MARKETING
You have photo samples in hand. You’ve approved the fit and you are ready to get creative with your marketing. Ideally, you have a strategy in place for social media, email blasts, and website launch. You have updated your inventory management software, and you are about to go into production. Now have fun taking inspiring photos and designing collateral for your marketing. Your hard work has almost paid off, do not fumble now!
CUTTING PRODUCTION FABRIC
You made it through the intense production process. Fit samples looked amazing, your fabric has been delivered to the cutter, and now it is the big day when your garments get cut! You have had your final meeting with the factory, going over the details outlined in your tech pack. They have tested the sewing line and have a date for delivery to the finishers. YOU ARE SO CLOSE!
DELIVERY
Your garments have been cut, sewn, finished, tagged, and bagged. They are now being delivered to the facility where they will be stored until some lucky customer buys it! YOU DID IT!
PRODUCT LAUNCH
This is a big deal. Celebrate. Have a party. Trust that all your hard work will result in sales and profits, and get ready to do it all again. You are officially now a designer with a successful company.
YOU CAN DO THIS
The production process is expensive, time-consuming, emotional, and risky, but with good planning and budgeting, you CAN do this. You are smart enough to figure it out, and there are many resources for self-education right at your fingertips. Just look at this website and see the absolute wealth of information available to you! Things will go wrong, as that is the nature of apparel and product development, but if you have planned well, it will not be a crisis, just a little speedbump.
Now you know the basics of the pre-production apparel process, so GET TO WORK! In future posts, I will go more into depth into these processes. If you want to connect, you can reach out at https://www.facebook.com/HannahSDesigner and I look forward to being able to answer more of your questions in the future.


BAYLA LEWIS
Every single thing I have been reading in startup fashion has been incredibly helpful! Thankyou so so much for so generously giving over all of this information!I always have a tin of questions and I dont always know where to start. Your guides are not just inspirational, they are also extremely actionable and I cannot thankyou enough for all the clarity!
Casey Cline
That’s wonderful to hear and I’ll pass this on to Hannah, who wrote this post. Let us know in the comments if there’s ever a specific topic it would be helpful to see as a blog post!